
Blog Archive

PTU tutorials
Gimmie Dat Mojo
Peeking Prividges
If Loving You is Wrong
Santa's Bitch
Duck Tape
Gettin' Hot in Here
Proud Xeracx Stalker
Put My Old Blue Jeans On
Happy Haunting
BCA awareness
Makin' Whoopee
Define Good
Ring in the New Year
Remember, Dream, Live
Dirty Mind
Sweet Valentine
Drink until you're Green
Peace, Love and Groovy
PSP Addict
In My Thoughts and Prayers
Bitch Down the Street
FTU
What happens at Santa's..
Aim to Tease
Mayhem Gurl
Irish Babe
Good Friends
I'm Just Me
Summer Forum Set
Happy Spring
Really Naughty
You are Perfect to Me
Lifetime Friend
Hot Stuff
Like Strawberry Wine
Love My Dog
Make me Bad
1st Forum Set
Fan Club
It's Christmas
Summertime Fun
Attitude, What About It
Bad Case of Loving You
Naughty List
Skullicious
Rock n' Roll Babe
Welcome New Baby
My World
Irish Girl
Bitches for Breakfast
Four Letter Word
Sweet Dreams
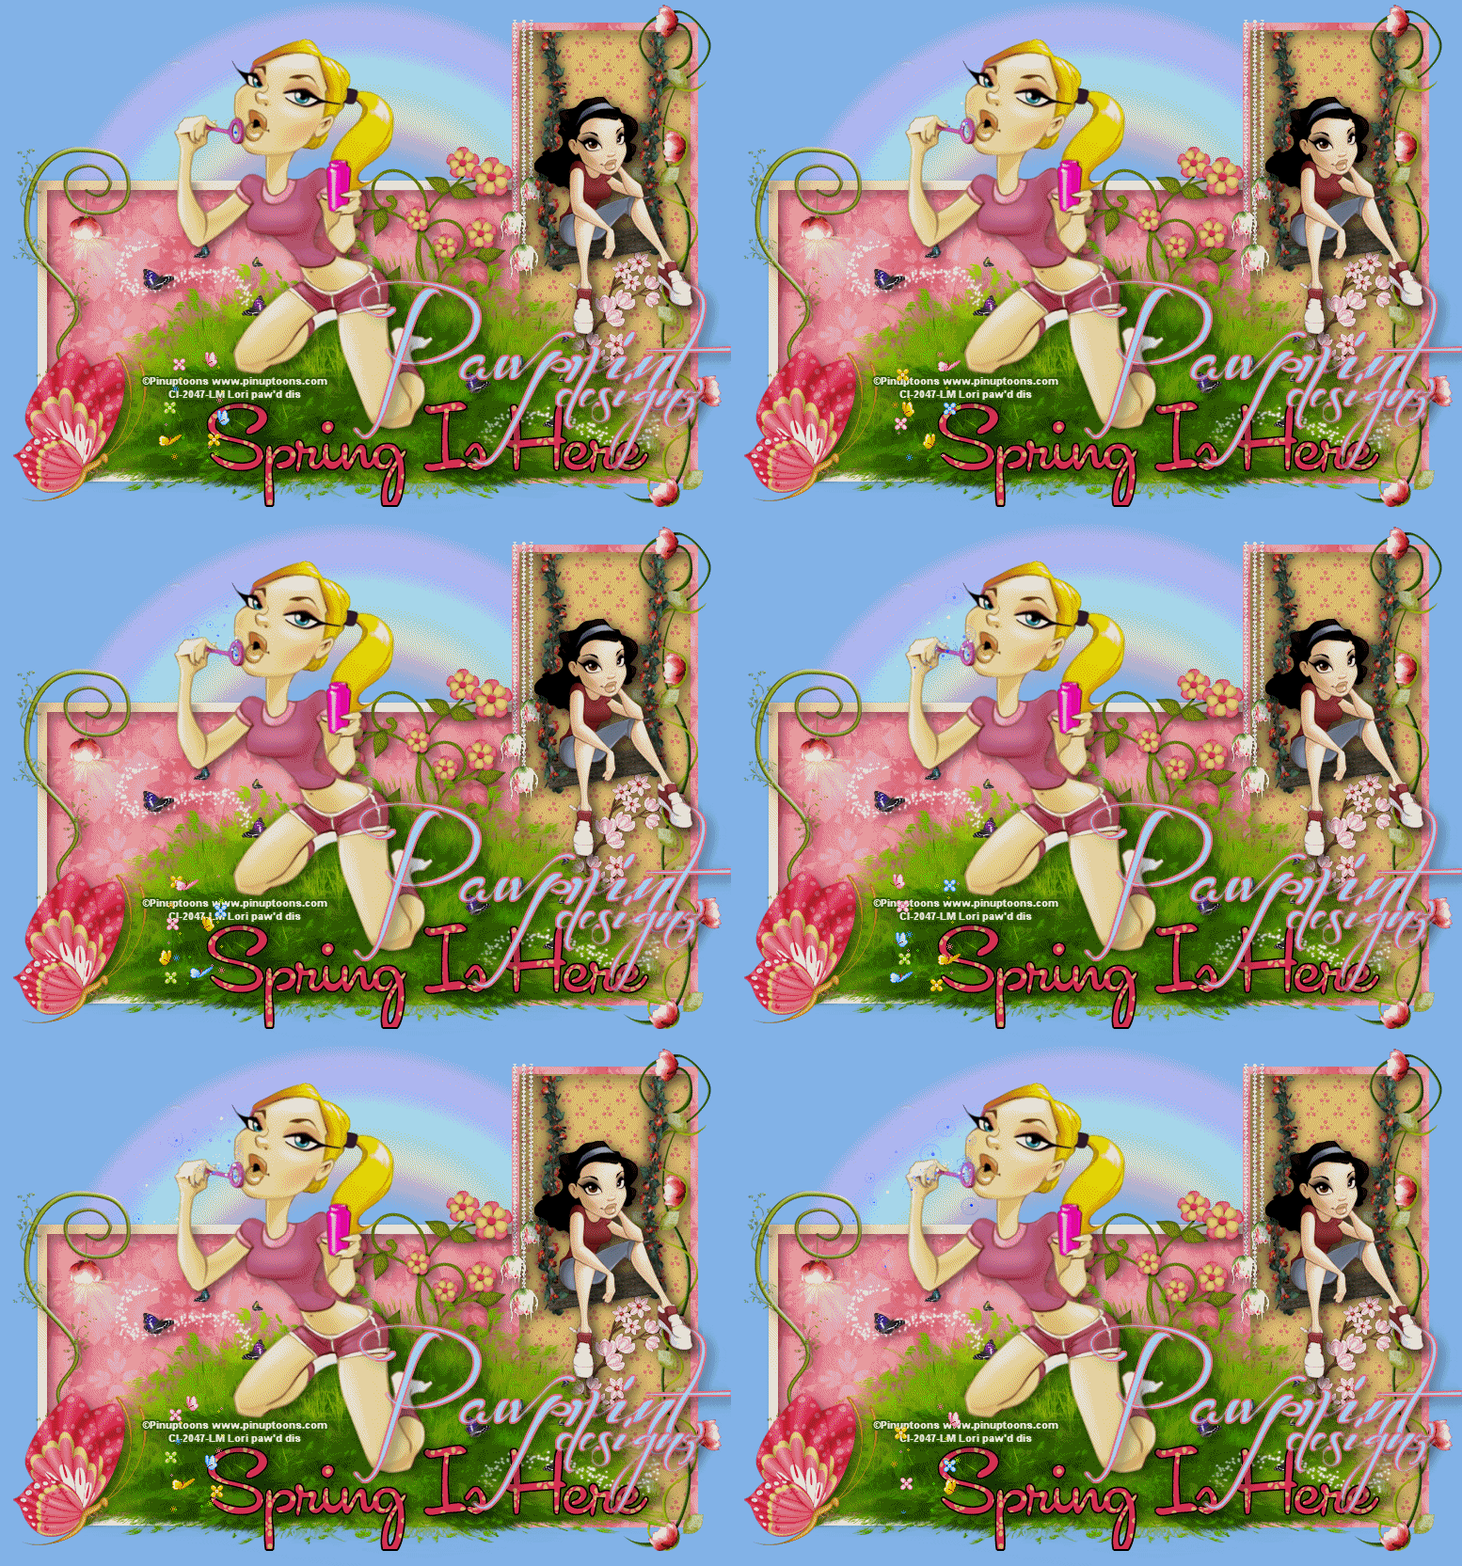
Spring is Here!
Kits longer available
Wednesday, April 4, 2012
Spring is here!
This tutorial was written by me, Lori, on March 24, 2012. And it was written for those who should already have a basic knowledge of working with PSP. I used Paint Shop Pro X3 Do not copy this tutorial and post it through any group or claim it as your own. Please share a text link only.
Any resemblance to any other tutorial is strictly coincidental.
Supplies needed
Tube(s) of choice, I used the Artwork by ©Pinup Toons you must purchase a license found here.
PTU Scrapkit by Shani of Wicked Princess Scraps called Fairy Whispers and can be found here.
Tag template by Kaci made exclusively for Creative Misfits and can be found here.
For animation,
Butterflies of choice or you can use the ones I used,
here.
here.
Bubbles animation from Chaos, (at the moment they are down, hoping she gets them back up soon!)
you can get them at her blog, when up again, here.
you can get them at her blog, when up again, here.
Animation Shop if you choose to animate.
(instructions will be below the tutorial.)
Please remember to stop and save often.
Add drop shadow of choice as you go.
Refer to my example as needed, merge layers down as needed to make things a little easier.
Let's Rock this Tutorial!!
Open up the template.
Shift + D.
Close out the original.
Highlight Raster5 layer
Open the rainbow element, copy and paste as a new layer,
arrange up and slightly to the left, so it's over the white oval.
Delete Raster5 layer.
Go to Raster6 layer,
select-all-float-defloat
Go to Raster3 layer and hit the delete button on your keyboard.
Arrange Raster3 layer above Raster6 layer.
Go to Raster6 layer,
open paper of choice, I used paper1, Resize 75%.
Copy and paste as a new layer rearrange to fit over the rectangle.
Go back to Raster 6 layer, select-all-float-defloat-invert
Go to the paper layer and hit the delete button on your keyboard.
Delete Raster6 layer.
Go to Raster3 layer
With your Change target tool change the color to #b17e2a
Go to Raster4 layer,
open paper of choice, I used paper6. Resize 75%.
Copy and paste as a new layer rearrange to fit over the tall rectangle.
Go back to Raster4 layer, select-all-float-defloat-invert
Go to the paper layer and hit the delete button on your keyboard.
Paste paper1 as a new layer arrange above paper6 layer.
Go back to Raster4 layer, select-all-float-defloat-modify
expand by 2-invert, go to paper1 layer that you just added
and hit the delete button on your keyboard.
Go back to Raster4 layer, select-all-float-defloat-modify
contract by 5, go back to paper1 layer and hit the delete button on your keyboard.
You should now have a frame.
Delete Raster4 layer.
Open element Vine, rotate left and resize 50%
Copy and paste as a new layer and arrange to the right
of the tall rectangle.
Open element Rosedangles, resize 50%
Copy and paste as a new layer and arrange to the left
of the tall rectangle.
Open element VineLanteren, resize 50%
Copy and paste as a new layer and arrange to the left
of the long rectangle. (if adding a drop shadow,
I added the shadow on a new layer
and erased the part of the shadow for the 'light'.
Open element Grass.
Copy and paste as a new layer and arrange
to your liking in the middle of the tag.
Open flower elements of choice and resize,
I used Doodle Flowers resized at 40% and
Flowerbranch resized at 30%.
Paste as new layers, behind the grass and arrange to liking.
Go to Raster2 layer, (the butterfly)
Open the butterfly element, mirror and resize 40%
copy and paste as a new layer and arrange over the butterfly in the template.
Delete Raster2 layer.
Open paper5, resize 75%, copy and paste as new layer
above Raster7. Go to Raster7-select-all-float-defloat-invert
Go to the paper layer and hit the delete button on your keyboard.
Delete Raster7.
Add tube of choice above the grass layer and
arrange to your liking.
Open swing element, resize 50%
arrange to fit inside of frame.
Open tube of choice, same artist as the one above,
resize to fit on the swing.
Copy and paste as new layer and arrange on the swing.
Merge the swing and tube on one layer.
Go to Raster1 layer, and flood fill to desired color.
Add license, copyright info, name and save if you are stopping now.
Thanks for Rocking Out my tutorial, I hope you enjoyed! ~Lori
For animation:
Bubbles:
Make all layers of the tag visiable except for the swing and tube sitting on the swing.
Copy merged layers and paste as new animation in animation shop. Hold Ctrl + shift+ l
buttons and continue pasting until you have 60 frames.
Open the bubbles in animation shop. Delete frame 2, the credit frame.
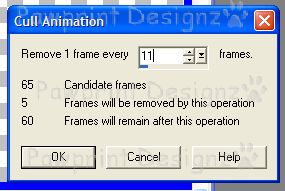
Edit-select all-animation-cull animation with the following settings.
Select-all-copy. Go to the tag in animation, hit ctrl+a, then ctrl+e to paste into selected
frame. When it comes up, arrange it so the little blue dot in the first frame is in the middle
of the bubble wand, then right click.
Butterflies:
Open butterflies hit ctrl+a, ctrl+x, go to the tag, ctrl+a, ctrl+e, arrange butterflies to
liking, right click.
Swing:
go to paintshop pro, go to layers, view, invert.
So only the swing and tube sitting on it is visible, copy.
Go to animation shop, and paste as a new animation.
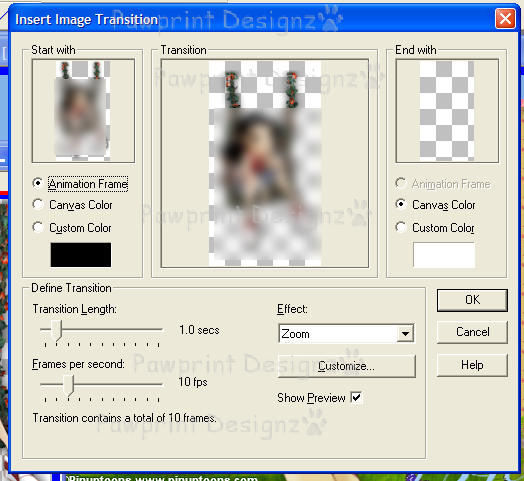
Go to
Insert Image Effect using the following settings:
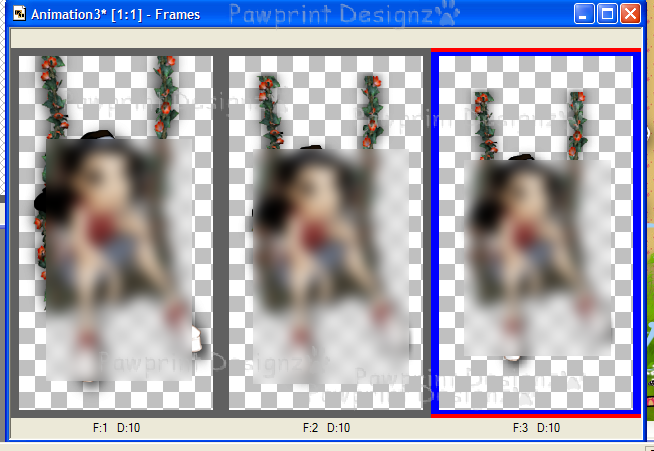
Go to frame 4, select it, holding down the ctrl button, select every frame after frame 4,
hit the delete button on your keyboard, you should only have 3 frames left.
(you don't want the last frame being so small, that is why we made it with
10 and then deleted, if you make it with 3 frames, the last one would be to small.)
Go to the 1st frame, with your move tool, very CAREFULLY,
slide the swing to the top, do this for the 2nd and 3rd frames also.
This will be your '1st set of swing animation' for later use.
Ctrl+a, Ctrl+c, ctrl+v, (select-all-copy-paste as new animation)
Go to animation on your tool bar, reverse frames.
Ctrl+a, Ctrl+c, go to the 1st set of swing animation,
and paste after last frame.
Ctrl+a, Ctrl+c, go to last frame,
Ctrl+Shift+l, which will copy all 6 frames and paste them after the last frame.
Keep hitting Ctrl+Shift+l until you have 30 frames,
then hit Ctrl+a,Ctrl+c,
go to last frame,Ctrl+Shift+l, which will give you 60 frames total!
Hit Ctrl+a, Ctrl+c one more time!
Go to the tag, Ctrl+a, Ctrl+e to paste into selected frame,
once it shows up, arrange to fit just under the frame of the long rectangle.
Go to animation, with all frames still selected, frame properties, and set to 25.
View and Save animation!
(If you need help in saving an animation, click here.)
P.S. if there is any problem with this tutorial...please feel free to email me at pawprintdesignz@aol.com :)

Optimazation Tut for Animation Shop
Open Animation Shop
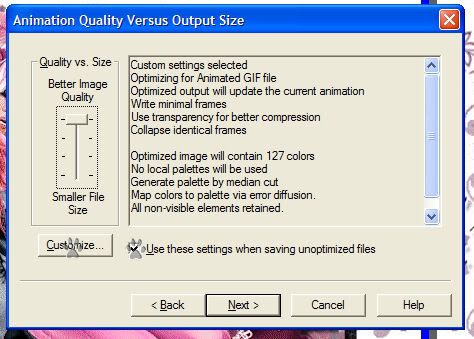
Go to Optimization Wizard, follow through each step below.
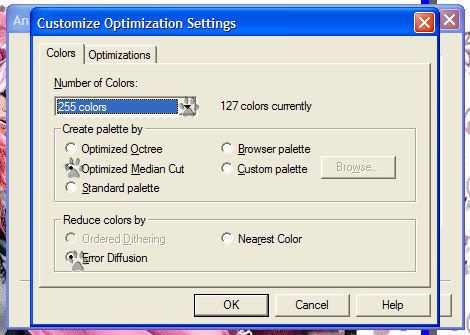
with these settings hit ok
then hit next
hit 'next', 'next', 'finish'
Save as and you're done! :)

Tuesday, March 6, 2012
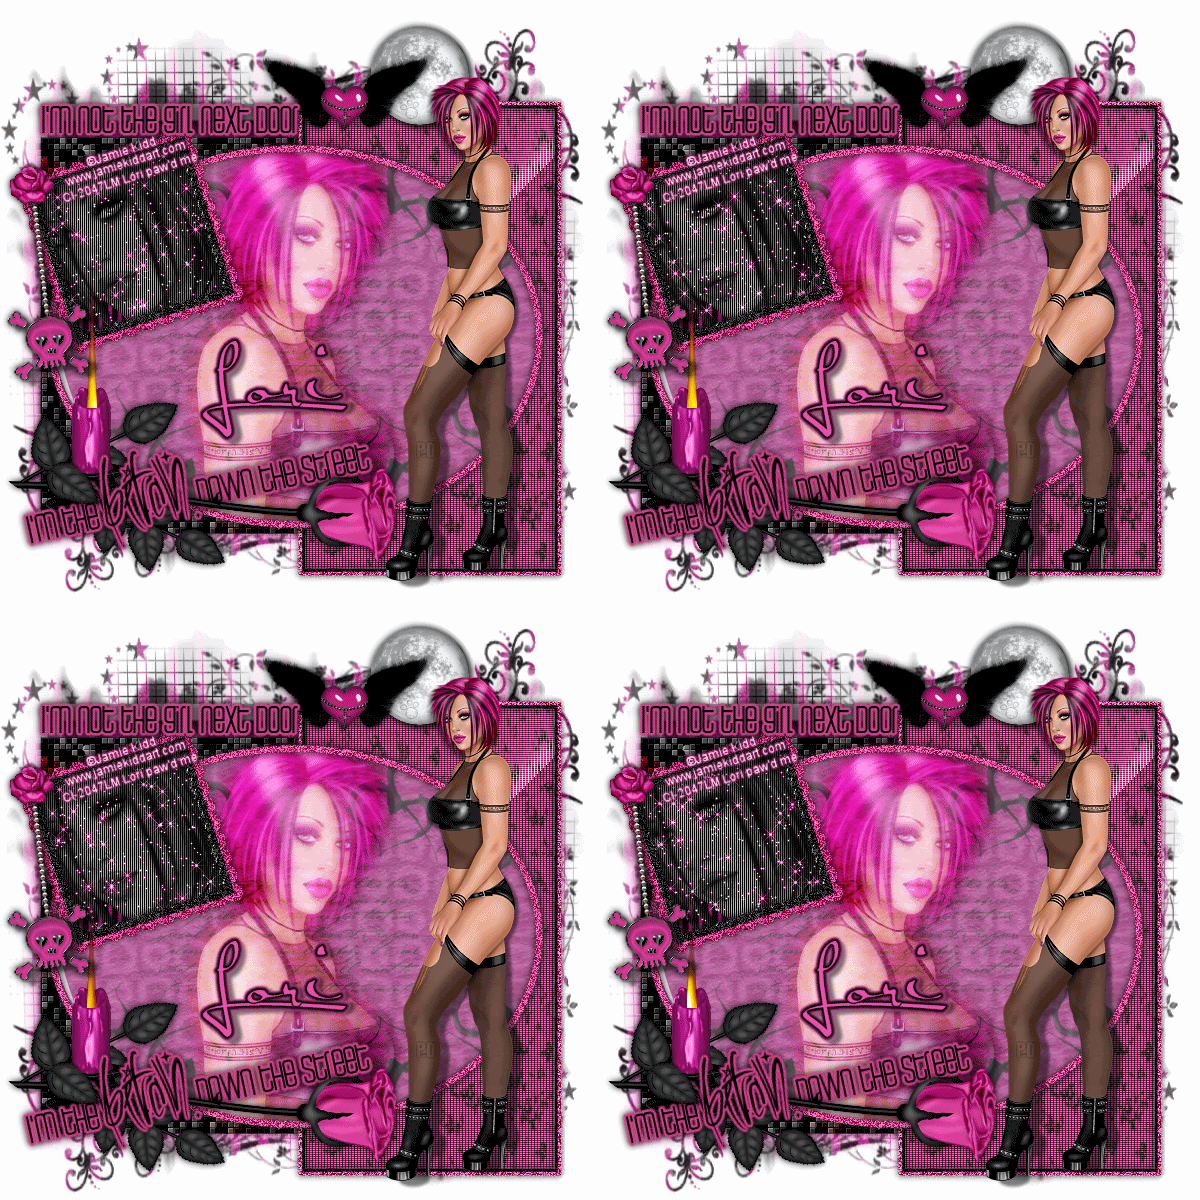
FTU~Bitch Down the Street
And it was written for those who should already have a basic knowledge of working with PSP. I used Paint Shop Pro XI
Do not copy this tutorial and post it through any group or claim it as your own. Please share a text link only. If you use this tutorial please send me a copy of the tag you made with it to my e-mail to the left. I'd LOVE to see the creations and post into my slide show! Thank You!
Any resemblance to any other tutorial is strictly coincidental.
Supplies needed
Tube(s) of choice, I used the Artwork by ©Jamie Kidd, you must purchase a license found here.
FTU Scrapkit by Lacarolita's Designz called "Gothic Feelings" and can be found here.
Tag template 54 by Deb of Creative By Nature, one of the Creative Misfits templates challenge and can be found here.
Font of choice (I used Satisfaction)
Mask of choice
Plug Ins (all are optional):
Xero (Porcelian and Fritillary)
Tramages (Tow the line and Groovy Bachelor Pad)
AlienSkinXenofex2 (Constilation)
EyeCandy 4000 (Fire and Gradient Glow)
Alienskin EyeCandy 5 Impact (Glass)
Please remember to stop and save often.
Add drop shadow of choice as you go. Refer to my example as needed, merge layers down as needed to make things a little eaiser.
Let's Rock this Tutorial!!
Open the template in PSP, using your shortcut keys on your keyboard (SHIFT+D) duplicate the template as a new image. Close the original.
Open papers, 2, 4, 5 and 7. Minamize for later use.
Go to background layer, Select-All, add a new raste layer, open paper7, copy and paste into selection, add mask of choice.
Go to the raster4 layer, Select-All-Float-Defloat, add new raster layer and paste paper 5 into selection. Go to Plug In, Xero; Fritillary using these settings: Granularity: 6; Aggression: 255; Tesselation: 100; Variation: 88. Go to original layer, go to Adjust-Blur-Gaussian Blur radius set to 10.
Go to raster2 layer, change to color of choice, (I used #e74ea9). Go to Adjust-Add/Remove noise-Add noise with these settings: Uniform checked; Noise set to 100%; and Monochrome checked. Go to Copy of Vector1 layer, the black rectangle, Select-All-Float-Defloat, go back to raster2 layer and hit the delete key on the keyboard. Arrange this layer above the raster8 layer. Add dropshadow of choice.
Go to raster8 layer, Select-All-Float-Defloat, go back to Copy of Vector1 layer and hit the delete key on the keyboard. Arrange this layer above the raster8 layer. But below the raster2 layer.Add dropshadow of choice.
Go to the raster5 layer, Select-All-Float-Defloat, add new raster layer and paste paper2 into selection. Go to Plug In Tramages-Tow the line, using these settings: Control 0: 21; Control 1: 85; Control 2: 142; Control 3: 47. Delete original raster5 layer.
Go to Copy of Vector1 layer, Select-All-Float-Defloat, add new raster layer and paste paper2 into selection. Go to Plug in: Tramages - Groovy Bachelor Pad using these settings: Tile size: 236; Offset: 157; Shading: 21. Go to Alienskin EyeCandy 5 Impact-Glass using these settings: Bevel width: 29.5; Bevel Smoothness: 30.; Round Selection Corner: 0; Bevel Placement: Inside; Glass Color: White; Opacity: 40; Tinting: 56; Refraction: 29; Inner Shadow Opacity: 75; Drop Shadow: 75; Shadow Offset: 18.28; Shadow Glow:0.
Add tube of choice to fit inside oval, resize to liking. Go to the paper2 oval background, Select-All-Float-Defloat-Invert, go back to the tube and hit the delete key on the keyboard. Go to Plug In Xero-Porcelain using these settings: 50-128-128-0-0-255. Dulplicate layer, on the original layer, go to Adjust-Blur-Gaussian Blur radius set to 10, go to your layer properties and set to overlay . On the copied layer, set the layer properties to screen.
Go to raster 3 layer, change to color of choice, (I used #e74ea9). Go to Adjust-Add/Remove noise-Add noise with the same settings as above.
Go to raster 5 layer, Select-All-Float-Defloat, add new raster layer and paste paper 7 into selection. Add close up of tube of choice, Go to Plug In Xero-Porcelain using the same settings as above. Go to Tramages-Tow the line using these settings: Control 0: 6; Control 1: 17; Control 2: 23; Control 3: 0. Set the layer properties to Luminance. If your going to do animation duplicate this layer 3 times so you have four layers. On each layer go to Plug in: AlienSkinXenofex2 Constilation: using these settings: Star Size: 2.85; Size Variation: 61; Edge Star Density: 1; Overall Star Density: 5; Overdrive: 100; Twinkle Amount: 50; Twinkle rotation: 45; Background fill: Keep original image; Random Speed: 5834. Do this to each layer only changing the speed each time. Make all but the original unvisiable.
Open square frame of choice, resize and arrange to fit over tube close up. Go to Adjust-Add/Remove noise-Add noise with these settings: Uniform checked; Noise set to 100%; and Monochrome checked.
Add Graident Glow, (I used #e74ea9) and dropshadow of choice to wordart. You may want to tilt the wordart at the bottom just a little. Add element rose of choice, resize and arrange below the bottom word art. Add element candle of choice, resize and arrange above the rose. Duplicate the rose and arrange above the wordart, carefully erase some of the rose over the candle and wordart so it looks like it's going through the wordart. See mine for an example.
Add tube of choice again, resize if needed and arrange to the right of the image.
Add anyother elements of choice.
Add name , Copyright info, and license, you may save now or wait to do the animation!
For animation of flames:
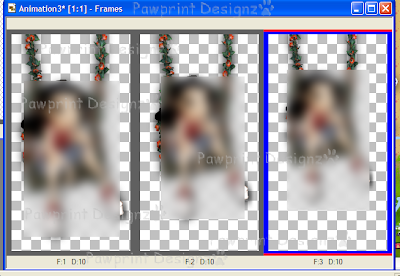
Go to with your magic wand set to Freehand, Point to point: carefully make a selection around the flame. Go to Plug in: EyeCandy 4000 Fire using these settings: Direction: 90; Column Length: 739.13; Flame Width: 13.86; Side Taper: 33.49; Movement: 33; Check Denser Flames; Check Start from far side; Random Seed: 67; hit ok. Select none and copy MERGED. In AS: Paste as a new animation. Go back in PSP, undo your flame until you just have the outlines again. (CTRL Z) make the first closeup to unvisiable and the second one visiable. Apply the fire again but hit the Random Seed to liking. Select None, copy MERGED and paste After Current frame in AS. do this until you have all 4 close ups and a new flame speed setting each time. Once you have all 4 frames in animation shop, Go to Edit-Selecet-All, Go to Animation-Frame Properties and set the display time to 20. View and Save animation!

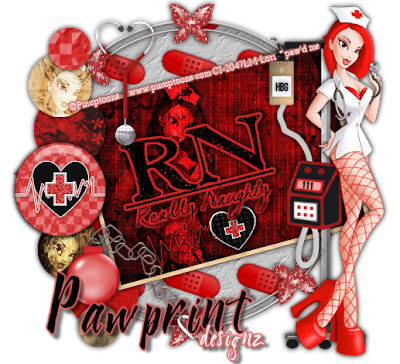
REally Naughty
And it was written for those who should already have a basic knowledge of working with PSP. I used Paint Shop Pro XI
Do not copy this tutorial and post it through any group or claim it as your own. Please share a text link only. If you use this tutorial please send me a copy of the tag you made with it to my e-mail to the left. I'd LOVE to see the creations and post into my slide show! Thank You!
Any resemblance to any other tutorial is strictly coincidental.
Supplies needed
Tube(s) of choice, I used the Artwork by ©Pinuptoons, you must purchase a license found here.
PTU Scrapkit by Shani of Wicked Princess called "Naughty Nurse" and can be found here.
Tag template#48 by Missy of Divine Intentionz and can be found here.
Word art by Vicky of True Taggin Love and can be found here.
Font of choice (I used My Nerd)
Please remember to stop and save often.
Add drop shadow of choice as you go. Refer to my example as needed, merge layers down as needed to make things a little eaiser.
Let's Rock this Tutorial!!
Open the template in PSP, using your shortcut keys on your keyboard (SHIFT+D) duplicate the template as a new image. Close the original.
Open paper several papers of choice. Minamize for later use.
Go to large circle layer, Open paper image3, go to Selections-All-Float-Defloat. Add new raster layer and paste into selection. Delete original layer.
Do this to all the smaller circles except circle 3 and to frame the background and frame.
For circle 3, open button 2, resize 134x139 pixels, copy and paste as a new layer and arrange to fit over circle 3.
Open butterflywireframe of choice, arrange above the large circle layer.
Add tube of choice, arrange and resize to fit to liking inside the frame. Go to Effects-PhotoEffects-Black and White film with setting to your liking. Go to your layer properties and set to overlay. Go to your frame background, go to Selections-All-Float-Defloat-Invert go to the tube layer and hit the delete key on your keyboard. Duplicate 3 times so you have 4 layers. Arrange one to the second circle at the top, go to that circle, go to Selections-All-Float-Defloat-Invert go to the tube layer and hit the delete key on your keyboard. Do this with another tube but placing it in the circle under the button layer. Leave the last two layers where they are, do not merge down, it will lighten it up, to me it just looks better.
Open the stat element, resize to 179x103 pixels, arrange to the bottom of the frame background layer.
Add wordart of choice, resize to likin, go to Selections--All-Float-Defloat-Modify-Expand by 3. Add a new raster layer, arrange below the wordart and flood fill with color of choice.
Add Stethascope resize to 92x178 pixels, arrange to the top of the wireframe, to make it look like a part of it is going throught the frame, with your eraser tool set to a small size setting, I used 4, carefully erase a very small portion of the stehascope.
Open IVdrip, resize to 143x423 pixels, arrange to the right of the image. Add tube of choice, and arrange above the IV drip. If using the same tube and you want her arm to 'wrap around' the drip, first you will add a dropshadow of choice, then duplice the tube and arrange one below the drip, go to the top tube and carefully erase a very small portion of the arm Go to the bottom tube and carefully erase most of the tube except the portion of the arm. this way the shadow isn't too much on the tube.
Add anyother elements of choice.
Add name , Copyright info, license and save!
Thanks for Rocking Out my tutorial, I hope you enjoyed! ~Lori

Girlfriends
This tutorial was written by me, Lori, on April 28, 2010.
And it was written for those who should already have a basic knowledge of working with PSP. I used Paint Shop Pro XI
Do not copy this tutorial and post it through any group or claim it as your own. Please share a text link only. If you use this tutorial please send me a copy of the tag you made with it to my e-mail to the left. I'd LOVE to see the creations and post into my slide show! Thank You!
Any resemblance to any other tutorial is strictly coincidental.
Supplies needed
Tube(s) of choice, I used the Artwork of Pinuptoons, you must purchase a license found here.
PTU Scrapkit by Tamsin of Tamsin McAtee Studios called "Dirty Faces" no longer available.
Tag template #55 of Horseplay's Pastures and can be found here.
Wordart by Bethany of Elegant Wordart by Bethany and can be found here.
Font of choice (I used CK Tango BT)
Eye Candy 4000, (Optional for wordart and name.)
Mask of choice. I used mask
Please remember to stop and save often.
Add drop shadow of choice as you go. Refer to my example as needed, merge layers down as needed to make things a little eaiser.
Let's Rock this Tutorial!!
Open the template in PSP, using your shortcut keys on your keyboard (SHIFT+D) duplicate the template as a new image. Resize canvas 700x700 pixles, you may crop and resize later. Close the original.
Open papers 2, 3, 10, 12, 19 and 20, minamize for later use.
Go Copy of Raster 2 layer, Select-All, add new raster layer, paste paper20 into selection. Duplicate 3x's so you have 3 layers. Go the Raster 1 layer, Selections-All-Float-Defloat-Invert, go to one of your paper20 layers and hit the delete key on your keyboard. Do this with Raster2 and Copy of Raster 2 and the 2 of the remaining paper20 layers. Delete original layers. Make the 3rd layer invisible so we may use it later.
Open element ribbon1, resize to 670x23 pixels. Paste as a new layer and arrange to fit in the middle of the bottom rectangle. Go Selections-All-Float-Defloat-Invert, and hit the delete key on your keyboard. Duplicate layer and arrrange to fit inside the top rectangle.
Go the Raster 4 layer, Select-All, add new raster layer, paste paper2 into selection. Go back to Raster4 layer Selections-All-Float-Defloat-Invert, go back to the paper2 layer and hit the delete key on your keyboard. Add tube of choice as a new layer, arrange to fit to your liking inside the oval frame. If there is any hanging over the frame, Go back to Raster4 layer Selections-All-Float-Defloat-Invert, then go back to the tube and hit the delete key on your keyboard. Delete the original raster4 layer when done. Go to the tube layer, in your layer properties set to Luminance (Legacy) and visiablity to 40%.
Go the Raster 3 layer, Select-All, add new raster layer, paste paper19 into selection. Duplicate 2x's and x out the copy so you cannot see them, we will use them later. Go back to Raster3 layer Selections-All-Float-Defloat-Invert, go back to the paper19 layer and hit the delete key on your keyboard.
Go back to one of the duplicated paper19 layers and make it visiable, arrange on top of the Top Frame layer. Go to the Top Frame layer, Selections-All-Float-Defloat-Invert, go back to the copy of paper19 layer and hit the delete key on your keyboard. Do this with the Bottom Frame layer also.
Go to the 3rd paper20 layer you had from earlier, make it visible now and arrange above the Middle frame layer. Go to the Middle Frame layer, Selections-All-Float-Defloat-Invert, go back to the copy of paper20 layer and hit the delete key on your keyboard.
Go the Top Frame Background, Select-All, add new raster layer, paste paper12 into selection. Duplicate 1x's and x out the copy so you cannot see it, Go back to the Top Frame Background, Selections-All-Float-Defloat-Invert, go back to the paper12 layer and hit the delete key on your keyboard. Make the copy of paper12 visible and arrange above the Bottom Frame Background layer, Do the same as above with the copy of paper12 and the Bottom Frame Background, delete original layers.
Go the Middle Frame Background, Select-All, add new raster layer, paste paper10 into selection. Go back to the Middle Frame Background, Selections-All-Float-Defloat-Invert, go back to the paper10 layer and hit the delete key on your keyboard.
Go to the top frame background and add tube of choice as a new layer, resize and arrange to the right of the frame, to your liking. If there is any hanging over the frame, Go to background layer Selections-All-Float-Defloat-Invert, then go back to the tube and hit the delete key on your keyboard. Add another tube of choice, do the same as above only arrange to the left of the frame. For the tube on the left, in your layer properties set to Luminance (Legacy) and visiablity to 50%. Do this also with the top frame background, only do the layer properties to the tube on the right.
Go to the middle frame background and add tube of choice as a new layer, resize and arrange to the right of the frame, to your liking. If there is any hanging over the frame, Go to background layer Selections-All-Float-Defloat-Invert, then go back to the tube and hit the delete key on your keyboard.
Open bow of choice, resize to 149x135 pixels, paste as a new layer and arrange to the left of the oval frame.
Open fastner of choice, resize to 76x139 pixels, paste as a new layer and arrange to the top right of the top square frame.
Open button of choice, resize to 79x79 pixels, paste as a new layer and arrange to the bottom left of the bottom square frame.
Open wordart, resize to 197x152 pixels, paste as a new layer and arrange to the top of the oval add gradient glow of choice.
Open doodle of choice, resize to 53x73 pixels, paste as a new layer and arrange just to the right of the wordart.
Open ribbons 3 and 4, resize to 635x110 pixels, paste as a new layers and arrange to the bottom of the image below the rectangle.
Add another tube of choice, resize and arrange to liking.
Crop and resize image to liking.
Go to the background layer, Select all add a new raster layer and paste paper3 into selections. Open your mask of choice, go to Layers- New mask layer-From Image, making sure that the mask image is in the source window, Source Luminance is clicked and depending on your mask if Invert mask data is checked or not. I notice with some of the masks I use, it doesn't need to be checked and some of them it does. Click ok. Go to your layer propeties and merge group.
Add Name with a Gradient Glow of choice, Copyright info, license and save!
Thanks for Rocking Out my tutorial, I hope you enjoyed! ~Lori

Sweet Dreams
This tutorial was written by me, Lori, on April 19, 2010.
And it was written for those who should already have a basic knowledge of working with PSP. I used Paint Shop Pro XI
Do not copy this tutorial and post it through any group or claim it as your own. Please share a text link only. If you use this tutorial please send me a copy of the tag you made with it to my e-mail to the left. I'd LOVE to see the creations and post into my slide show! Thank You!
Any resemblance to any other tutorial is strictly coincidental.
Supplies needed
Tube(s) of choice, I used ©Jamie Kidd, you must purchase a license to use her artwork and can be found here.
PTU Scrapkit by Merrily of I don't give a scrap called "Sweet Dreams" and can be found here.
Tag template#5, by Lacarolita's Designz and can be found here.
Font of choice (I used Panderia)
Plug ins Eye Candy 4000(optional for name) and Xero (Porcelain)
Please remember to stop and save often.
Add drop shadow of choice as you go. Refer to my example as needed, merge layers down as needed to make things a little eaiser.
Let's Rock this Tutorial!!
Open the template in PSP, using your shortcut keys on your keyboard (SHIFT+D) duplicate the template as a new image. You may crop and resize later. Close the original.
Delete raster layer 1.
Open 3 lace ribbons of choice, resize to 498x26 pixels, copy and paste as new layers, resize to fit over the raser layers 5, 6 and 7 lines. Duplicate each and go to Image-Free rotate and rotate Left 270 degrees. Arrange to fit over the raster layers 2, 3 and 4 lines. Delete all original layers.
Open paper7. Go to Raster 8, Select-All- Selections-Float-Defloat. Add new raster layer, copy and paste paper 7 into selection. Delete original layer.
Add close up of tube of choice, you may need to resize a little smaller, go to Effects-Photo Effects and add the black and white film effect of choice. Duplicate layer, go to the original go to Adjust-Blur-Gaussien Blur set to 20. Go to Duplicated layer and set visability to 30. Do the same with the close up of the teddy bear.
Open 2 stargems of choice, resize to 109x105 pixels and arrange to fit over the flowers on raster layers 9 and 10. Open the star element with the face on it, resize to 104x97 pixels and arrange to fit over the flower on raster layer 11.
Open pillow2, arrange to the right of tag, rotating just a little to lliking.
Add tube of choice, arrange to liking. Duplicate and move the copied layer below your laces. Go back to original and carefully erase any tubing that is hanging over the laces, for the bottom part of the tube, erase only the nightgown being sure not to erase any of the teddybear.
Open cloud, resize 325x193 pixels and arrange to the top right of the image, open cloud goodnight wa, resize 304x149 pixels and arrange to fit over the cloud. Open a moon of choice resize 105x118 pixels and arrange to the right of the cloud.
Open beaddoodle of choice, resize to 340x74 pixels and arrange at the bottom under the laces.
Open 3 bows of choice, resize to 108x113 pixels and arrange one to the right of the bottom horizontal laces, one to the left where the horizontal and vertical laces meet and the other to the top of the vertical laces.
Open bear3 resize to 117x145 pixels and arrange to sit at the right of the horizontal laces.
Add any other elements of choice.
Add Name, Copyright info, and save!
Thanks for Rocking Out my tutorial, I hope you enjoyed! ~Lori

Happy Spring
And it was written for those who should already have a basic knowledge of working with PSP. I used Paint Shop Pro XI
Do not copy this tutorial and post it through any group or claim it as your own. Please share a text link only. If you use this tutorial please send me a copy of the tag you made with it to my e-mail to the left. I'd LOVE to see the creations and post into my slide show! Thank You!
Any resemblance to any other tutorial is strictly coincidental.
Supplies needed
Tube(s) of choice, I used the Artwork of Pinuptoons, you must purchase a license found here.
PTU Scrapkit by Gina of Kekika Kits called "Enjoy" and can be found here.
Tag template Happy Spring by Daria of Loving Miranda and can be found here.
Font of choice (I used CK Springtime)
Please remember to stop and save often.
Add drop shadow of choice as you go. Refer to my example as needed, merge layers down as needed to make things a little eaiser.
Let's Rock this Tutorial!!
Open the template in PSP, using your shortcut keys on your keyboard (SHIFT+D) duplicate the template as a new image. Close the original.
Open papers 5, 9 and 13, minamize for later use.
Go Rec II, Select-All-Float-Defloat add new raster paste paper5 into selection. Go the same to RecI using paper7. Delete original layers.
Open grass element, resize and arrange above the line layer, delete original line layer.
Open flower of choice with no stem, resize and arrange above the circle farthest to the left with the heart. Delete all circle layers and the heart layer.. Open multiple flowers of choice resize and arrange behind the grass layer. Delete the large Rectangle layer.
Open button of choice, resize and arrange to fit between the two rectangle layers.
Open on bird, one bee and one dragon fly of choice, resize and arrange to liking.
Open scatter01, rsize and arrange above the Small Flowers layer, delete original layer.
Add tube of choice, resize and arrange to liking.
Go to the wordart layer, Selections-All-Float-Defloat, add new raster layer and paste paper13 into seletion. Delete original layer.
Add name Gradient Glow of choice, Copyright info, license and save!
Thanks for Rocking Out my tutorial, I hope you enjoyed! ~Lori

Subscribe to:
Posts (Atom)
 Thanks to Shani of Wicked Princess Scraps for the use of her kit, Strength In Me, a FTU kit to help raise awareness in testicular cancer. No matter what kind of cancer it is, if you love someone with cancer, be by their side and 'Love them through it'.


- Lori
- Hello, my name is Lori. I work full time as a Grooming Salon Manager, I LOVE my 4 legged 'Babies'! (Hence the name of my blog) I'm soon to be married to a Great man, Put (actually it's his nickname). I have 2 Beautiful Daughters and 1 Handsome Son. I also have 2 Grandsons, Hunter and Trey, and a Step-Grandson, Logan! In my spare time I love to make tags and scrap page Lo's! I hope you enjoy and come back often!


Kits no longer available
(but thought you'd still be interested)
Life is Short
Strokin'
Janesko's Merry Christmas
I Believe in Faries
Friends Make the world
Mystic
Sexy
Let's Get Rocked!
Under the Mistletoe
Coffee Time with Friends
Blow Your Mind
Addicted to Love
Sending My Love
Never Weary of Life
Candy Girl
Sweet as Candy
Sexifullicious
Respect the Sisterhood
Newsflash Sweetie
Girlfriends
Believe In Faries


