
Blog Archive
-
▼
2012
(56)
-
▼
March
(54)
- FTU~Bitch Down the Street
- REally Naughty
- Girlfriends
- Sweet Dreams
- Happy Spring
- In my Thoughts and Prayers
- Newsflash!
- Summer Forum Set
- Summertime Fun
- Four Letter Word
- Respect the Sisterhood
- Bitches for Breakfast
- My World
- PSP Addict
- Peacy, Love and Groovy
- Irish Girl
- Irish Babe
- Drink until you're Green
- I'm Just Me
- Sexifullicious
- Sweet as Candy
- Candy Girl
- Rock n' Roll Babe
- Skullicious
- Welcome New Baby
- Sweet Valentine
- Never Weary of LIfe
- Dirty Mind
- Sending My Love
- Addicted to Love
- Blow Your Mind
- Inner Bitch
- Remember, Dream, Live
- Coffee Time With Friends
- Lifetime Friend
- Ring in the New Year
- Define Good
- It's Christmas
- Under the Mistletoe
- Naughty List
- Makin' Whoopee
- Bad Case of Loving you
- Attitude - What About It?
- BCA awareness
- Happy Haunting
- Put My Old Blue Jeans On
- Proud Xeracx Stalker
- Let's Get Rocked!
- Sexy
- Gettin' Hot in here
- This is my first tutorial, I hope to have more com...
- PTU ~ Mystic
- PTU~Fan Club
- Friends Make the world go around
-
▼
March
(54)

PTU tutorials
Gimmie Dat Mojo
Peeking Prividges
If Loving You is Wrong
Santa's Bitch
Duck Tape
Gettin' Hot in Here
Proud Xeracx Stalker
Put My Old Blue Jeans On
Happy Haunting
BCA awareness
Makin' Whoopee
Define Good
Ring in the New Year
Remember, Dream, Live
Dirty Mind
Sweet Valentine
Drink until you're Green
Peace, Love and Groovy
PSP Addict
In My Thoughts and Prayers
Bitch Down the Street
FTU
What happens at Santa's..
Aim to Tease
Mayhem Gurl
Irish Babe
Good Friends
I'm Just Me
Summer Forum Set
Happy Spring
Really Naughty
You are Perfect to Me
Lifetime Friend
Hot Stuff
Like Strawberry Wine
Love My Dog
Make me Bad
1st Forum Set
Fan Club
It's Christmas
Summertime Fun
Attitude, What About It
Bad Case of Loving You
Naughty List
Skullicious
Rock n' Roll Babe
Welcome New Baby
My World
Irish Girl
Bitches for Breakfast
Four Letter Word
Sweet Dreams
Spring is Here!
Kits longer available
Tuesday, March 6, 2012
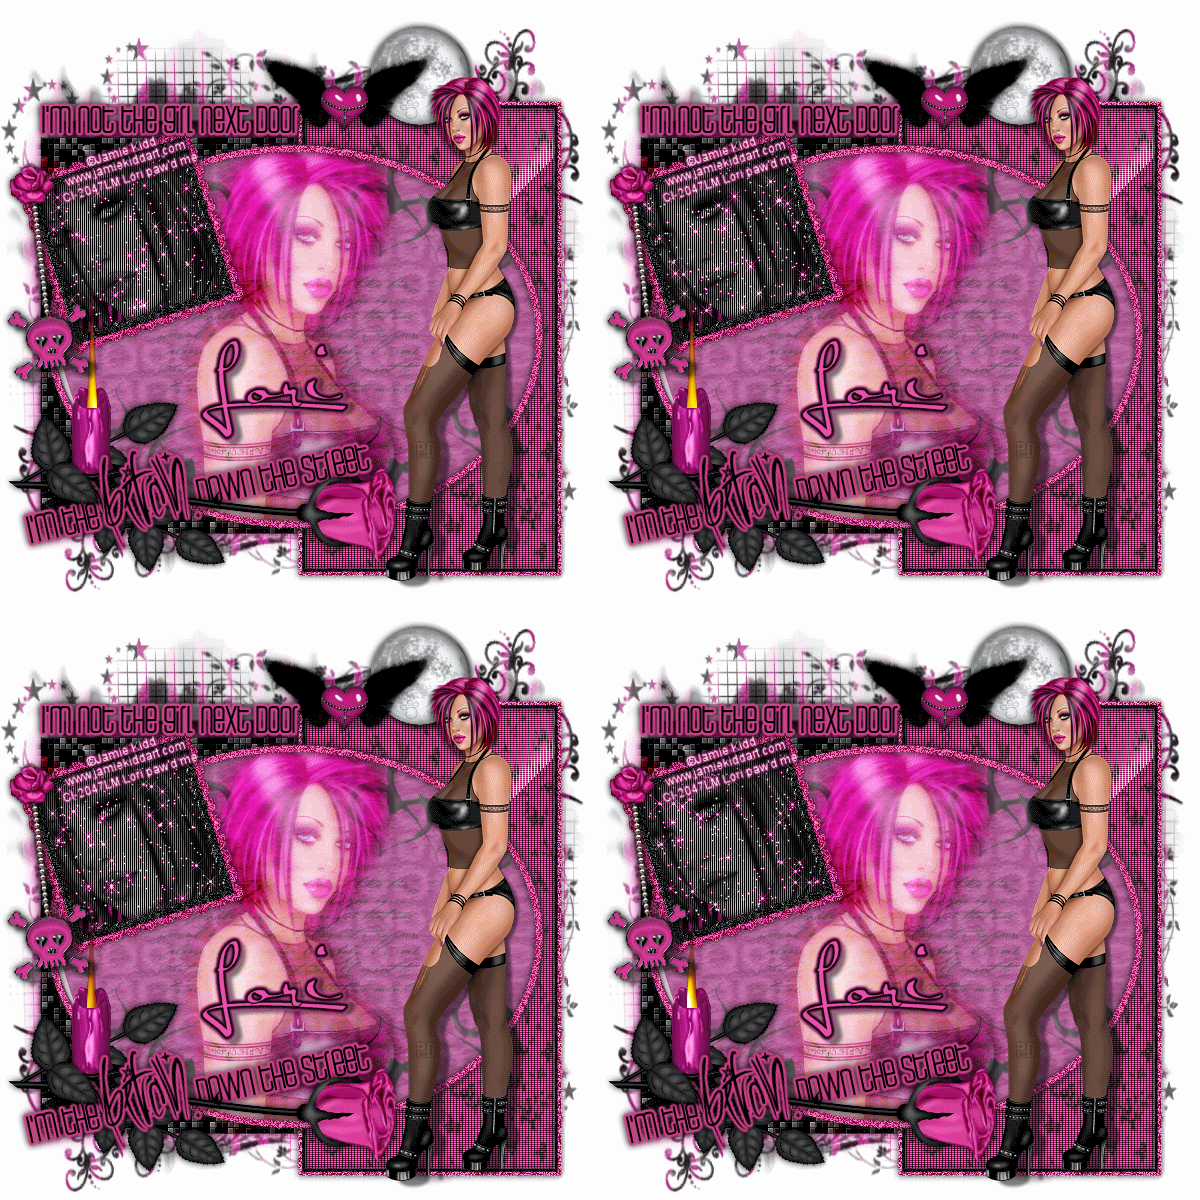
FTU~Bitch Down the Street
And it was written for those who should already have a basic knowledge of working with PSP. I used Paint Shop Pro XI
Do not copy this tutorial and post it through any group or claim it as your own. Please share a text link only. If you use this tutorial please send me a copy of the tag you made with it to my e-mail to the left. I'd LOVE to see the creations and post into my slide show! Thank You!
Any resemblance to any other tutorial is strictly coincidental.
Supplies needed
Tube(s) of choice, I used the Artwork by ©Jamie Kidd, you must purchase a license found here.
FTU Scrapkit by Lacarolita's Designz called "Gothic Feelings" and can be found here.
Tag template 54 by Deb of Creative By Nature, one of the Creative Misfits templates challenge and can be found here.
Font of choice (I used Satisfaction)
Mask of choice
Plug Ins (all are optional):
Xero (Porcelian and Fritillary)
Tramages (Tow the line and Groovy Bachelor Pad)
AlienSkinXenofex2 (Constilation)
EyeCandy 4000 (Fire and Gradient Glow)
Alienskin EyeCandy 5 Impact (Glass)
Please remember to stop and save often.
Add drop shadow of choice as you go. Refer to my example as needed, merge layers down as needed to make things a little eaiser.
Let's Rock this Tutorial!!
Open the template in PSP, using your shortcut keys on your keyboard (SHIFT+D) duplicate the template as a new image. Close the original.
Open papers, 2, 4, 5 and 7. Minamize for later use.
Go to background layer, Select-All, add a new raste layer, open paper7, copy and paste into selection, add mask of choice.
Go to the raster4 layer, Select-All-Float-Defloat, add new raster layer and paste paper 5 into selection. Go to Plug In, Xero; Fritillary using these settings: Granularity: 6; Aggression: 255; Tesselation: 100; Variation: 88. Go to original layer, go to Adjust-Blur-Gaussian Blur radius set to 10.
Go to raster2 layer, change to color of choice, (I used #e74ea9). Go to Adjust-Add/Remove noise-Add noise with these settings: Uniform checked; Noise set to 100%; and Monochrome checked. Go to Copy of Vector1 layer, the black rectangle, Select-All-Float-Defloat, go back to raster2 layer and hit the delete key on the keyboard. Arrange this layer above the raster8 layer. Add dropshadow of choice.
Go to raster8 layer, Select-All-Float-Defloat, go back to Copy of Vector1 layer and hit the delete key on the keyboard. Arrange this layer above the raster8 layer. But below the raster2 layer.Add dropshadow of choice.
Go to the raster5 layer, Select-All-Float-Defloat, add new raster layer and paste paper2 into selection. Go to Plug In Tramages-Tow the line, using these settings: Control 0: 21; Control 1: 85; Control 2: 142; Control 3: 47. Delete original raster5 layer.
Go to Copy of Vector1 layer, Select-All-Float-Defloat, add new raster layer and paste paper2 into selection. Go to Plug in: Tramages - Groovy Bachelor Pad using these settings: Tile size: 236; Offset: 157; Shading: 21. Go to Alienskin EyeCandy 5 Impact-Glass using these settings: Bevel width: 29.5; Bevel Smoothness: 30.; Round Selection Corner: 0; Bevel Placement: Inside; Glass Color: White; Opacity: 40; Tinting: 56; Refraction: 29; Inner Shadow Opacity: 75; Drop Shadow: 75; Shadow Offset: 18.28; Shadow Glow:0.
Add tube of choice to fit inside oval, resize to liking. Go to the paper2 oval background, Select-All-Float-Defloat-Invert, go back to the tube and hit the delete key on the keyboard. Go to Plug In Xero-Porcelain using these settings: 50-128-128-0-0-255. Dulplicate layer, on the original layer, go to Adjust-Blur-Gaussian Blur radius set to 10, go to your layer properties and set to overlay . On the copied layer, set the layer properties to screen.
Go to raster 3 layer, change to color of choice, (I used #e74ea9). Go to Adjust-Add/Remove noise-Add noise with the same settings as above.
Go to raster 5 layer, Select-All-Float-Defloat, add new raster layer and paste paper 7 into selection. Add close up of tube of choice, Go to Plug In Xero-Porcelain using the same settings as above. Go to Tramages-Tow the line using these settings: Control 0: 6; Control 1: 17; Control 2: 23; Control 3: 0. Set the layer properties to Luminance. If your going to do animation duplicate this layer 3 times so you have four layers. On each layer go to Plug in: AlienSkinXenofex2 Constilation: using these settings: Star Size: 2.85; Size Variation: 61; Edge Star Density: 1; Overall Star Density: 5; Overdrive: 100; Twinkle Amount: 50; Twinkle rotation: 45; Background fill: Keep original image; Random Speed: 5834. Do this to each layer only changing the speed each time. Make all but the original unvisiable.
Open square frame of choice, resize and arrange to fit over tube close up. Go to Adjust-Add/Remove noise-Add noise with these settings: Uniform checked; Noise set to 100%; and Monochrome checked.
Add Graident Glow, (I used #e74ea9) and dropshadow of choice to wordart. You may want to tilt the wordart at the bottom just a little. Add element rose of choice, resize and arrange below the bottom word art. Add element candle of choice, resize and arrange above the rose. Duplicate the rose and arrange above the wordart, carefully erase some of the rose over the candle and wordart so it looks like it's going through the wordart. See mine for an example.
Add tube of choice again, resize if needed and arrange to the right of the image.
Add anyother elements of choice.
Add name , Copyright info, and license, you may save now or wait to do the animation!
For animation of flames:
Go to with your magic wand set to Freehand, Point to point: carefully make a selection around the flame. Go to Plug in: EyeCandy 4000 Fire using these settings: Direction: 90; Column Length: 739.13; Flame Width: 13.86; Side Taper: 33.49; Movement: 33; Check Denser Flames; Check Start from far side; Random Seed: 67; hit ok. Select none and copy MERGED. In AS: Paste as a new animation. Go back in PSP, undo your flame until you just have the outlines again. (CTRL Z) make the first closeup to unvisiable and the second one visiable. Apply the fire again but hit the Random Seed to liking. Select None, copy MERGED and paste After Current frame in AS. do this until you have all 4 close ups and a new flame speed setting each time. Once you have all 4 frames in animation shop, Go to Edit-Selecet-All, Go to Animation-Frame Properties and set the display time to 20. View and Save animation!

Subscribe to:
Post Comments (Atom)
 Thanks to Shani of Wicked Princess Scraps for the use of her kit, Strength In Me, a FTU kit to help raise awareness in testicular cancer. No matter what kind of cancer it is, if you love someone with cancer, be by their side and 'Love them through it'.


- Lori
- Hello, my name is Lori. I work full time as a Grooming Salon Manager, I LOVE my 4 legged 'Babies'! (Hence the name of my blog) I'm soon to be married to a Great man, Put (actually it's his nickname). I have 2 Beautiful Daughters and 1 Handsome Son. I also have 2 Grandsons, Hunter and Trey, and a Step-Grandson, Logan! In my spare time I love to make tags and scrap page Lo's! I hope you enjoy and come back often!


Kits no longer available
(but thought you'd still be interested)
Life is Short
Strokin'
Janesko's Merry Christmas
I Believe in Faries
Friends Make the world
Mystic
Sexy
Let's Get Rocked!
Under the Mistletoe
Coffee Time with Friends
Blow Your Mind
Addicted to Love
Sending My Love
Never Weary of Life
Candy Girl
Sweet as Candy
Sexifullicious
Respect the Sisterhood
Newsflash Sweetie
Girlfriends
Believe In Faries


0 comments:
Post a Comment