

Blog Archive
-
▼
2012
(56)
-
▼
March
(54)
- FTU~Bitch Down the Street
- REally Naughty
- Girlfriends
- Sweet Dreams
- Happy Spring
- In my Thoughts and Prayers
- Newsflash!
- Summer Forum Set
- Summertime Fun
- Four Letter Word
- Respect the Sisterhood
- Bitches for Breakfast
- My World
- PSP Addict
- Peacy, Love and Groovy
- Irish Girl
- Irish Babe
- Drink until you're Green
- I'm Just Me
- Sexifullicious
- Sweet as Candy
- Candy Girl
- Rock n' Roll Babe
- Skullicious
- Welcome New Baby
- Sweet Valentine
- Never Weary of LIfe
- Dirty Mind
- Sending My Love
- Addicted to Love
- Blow Your Mind
- Inner Bitch
- Remember, Dream, Live
- Coffee Time With Friends
- Lifetime Friend
- Ring in the New Year
- Define Good
- It's Christmas
- Under the Mistletoe
- Naughty List
- Makin' Whoopee
- Bad Case of Loving you
- Attitude - What About It?
- BCA awareness
- Happy Haunting
- Put My Old Blue Jeans On
- Proud Xeracx Stalker
- Let's Get Rocked!
- Sexy
- Gettin' Hot in here
- This is my first tutorial, I hope to have more com...
- PTU ~ Mystic
- PTU~Fan Club
- Friends Make the world go around
-
▼
March
(54)

PTU tutorials
Gimmie Dat Mojo
Peeking Prividges
If Loving You is Wrong
Santa's Bitch
Duck Tape
Gettin' Hot in Here
Proud Xeracx Stalker
Put My Old Blue Jeans On
Happy Haunting
BCA awareness
Makin' Whoopee
Define Good
Ring in the New Year
Remember, Dream, Live
Dirty Mind
Sweet Valentine
Drink until you're Green
Peace, Love and Groovy
PSP Addict
In My Thoughts and Prayers
Bitch Down the Street
FTU
What happens at Santa's..
Aim to Tease
Mayhem Gurl
Irish Babe
Good Friends
I'm Just Me
Summer Forum Set
Happy Spring
Really Naughty
You are Perfect to Me
Lifetime Friend
Hot Stuff
Like Strawberry Wine
Love My Dog
Make me Bad
1st Forum Set
Fan Club
It's Christmas
Summertime Fun
Attitude, What About It
Bad Case of Loving You
Naughty List
Skullicious
Rock n' Roll Babe
Welcome New Baby
My World
Irish Girl
Bitches for Breakfast
Four Letter Word
Sweet Dreams
Spring is Here!
Kits longer available
Tuesday, March 6, 2012
PTU~Fan Club
This tutorial was written by me, Lori, on July 26, 2010.
And it was written for those who should already have a basic knowledge of working with PSP. I used Paint Shop Pro XI
Do not copy this tutorial and post it through any group or claim it as your own. Please share a text link only.
Any resemblance to any other tutorial is strictly coincidental.
Supplies needed
Tube(s) of choice, I used artwork by Lix, you must purchase a license found here.
PTU Scrapkit by Shani of Wicked Princess Scraps called “Poisoned Rain”and can be found here.
She also has a wonderful freebie add on to this kit and I used a few things from it also. All elements and papers used from freebie will be titled 'element WP_PRX'
Font of choice (I used Pussycat)
Tag template #340 by Missy of Divine Intentionz and can be found here.
Please remember to stop and save often.
Add drop shadow of choice as you go. Refer to my example as needed
Let's Rock this Tutorial!!
Open template, using your shortcut keys on your keyboard (SHIFT+D) duplicate the template as a new image. Resize canvas to 800x800 pixels, you will crop/resize later. Close the original.
Open papers 2, 8, 11, 22, WP_PRX 7, resize to liking, minamize to use later.
Go to Circle1, Select-All, add new raster layer, copy paper 14 and paste into selection.
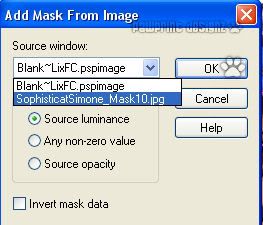
Go to your background layer, Select-All, add new raster layer, paste paper 2 into selection. Go to Layers-Add new mask layer from image making sure you have the source for the mask checked add your mask of choice. See image below:
Go to Layer-Merge-Group.
Go to Shape1 layer, Select-All-Float-Defloat, add new raster layer and paste paper 8 into selection. Do this also for shape layer2. Do the same for shape layers 3 and 4 pasting paper WP_PRX 7 from the add on kit into selection.
Go to the thin rectangle 1, open element WP_PRX Blingos resize 489x61 pixels and paste as a new layer, arrange to fit over the thin rectangle, Duplicate layer, go to Image-Flip and delete rectangles 1 and 2.
Go to Circle2 layer, open element Circle frame and arrange above circle two.
Go back to Circle2, Select-All-Float-Defloat, add new raster layer and paste paper 11 into selection. Delete circle 1 and glitter circle.
Go to frame background 1, select-All-Float-Defloat, add new raster layer and paste paper 22 into selection. Do this with frame backround2.
Go to frame2, with your change to target tool, change the color to color of liking, I used the blue from the kit. Do this with frame1.
Open element barbedwire resize 485x56 pixels and paste as a new layer, arrange to fit above the blingo on the top, duplicate layer, go to Image-Flip so it'll be below the blingo at the bottom.
Open element Amp, resize 109x117 pixels, paste as a new layer and arrange to the bottom left.
Open element speaker, resize 101x130 pixels, paste as new layer and arrange to the bottom right.
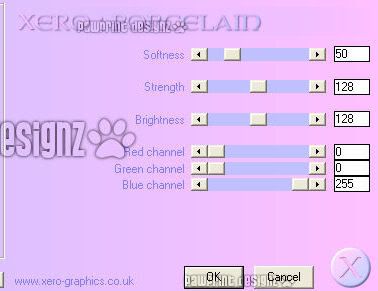
Add tube of choice, arrange to the right of the Amp. Duplicate layer and go to Image-Mirror so it'll be to the left of the speaker. If you like, duplicate the speaker layer and arrange the copy above the tube layer, with your eraser tool, carefully erase a small portion of the speaker on the left so it looks like part of the V guitar is in front of the speaker. Go to Plug-ins-Xero-Porcelain using the settings below:
Open element wingedbox, resize 332x161, paste as new layer and arrange at the top in the middle.
Open element emobunny, resize 169x167 pixels, paste as new layer and arrange at the bottom in the middle.
Open element WP_PRX_Screw, resize 45x47 pixels, paste as new layer and arrange to the top left of the mask layer, duplicate layer go to Image-Mirror so that it is to the top right of the mask layer.
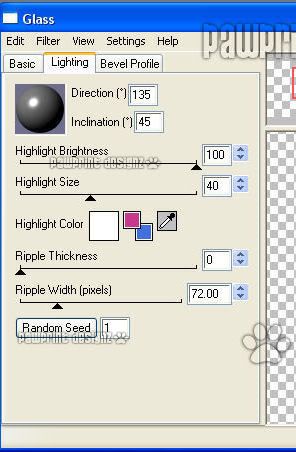
Go to word art, with your selection tool set to RBG Value, click inside the letters of Fan Club, go to Selection-Float-Defloat, add a new raster layer and paste paper 11 into selection. Go to Effects-Plug-ins-Eye Candy 4000-Glass using the settings in the images below.
Crop and resize all layers to liking.
Open element WP_PRX_Spikes, copy and paste as new layer with resizing it. Erase any spikes you wish not to be in the picture, I only left the three at the top and the far right and far left at the bottom.
Add name, Copyright info and license and save!
Thanks for Rocking Out my tutorial, I hope you enjoyed! ~Lori

Subscribe to:
Post Comments (Atom)
 Thanks to Shani of Wicked Princess Scraps for the use of her kit, Strength In Me, a FTU kit to help raise awareness in testicular cancer. No matter what kind of cancer it is, if you love someone with cancer, be by their side and 'Love them through it'.


- Lori
- Hello, my name is Lori. I work full time as a Grooming Salon Manager, I LOVE my 4 legged 'Babies'! (Hence the name of my blog) I'm soon to be married to a Great man, Put (actually it's his nickname). I have 2 Beautiful Daughters and 1 Handsome Son. I also have 2 Grandsons, Hunter and Trey, and a Step-Grandson, Logan! In my spare time I love to make tags and scrap page Lo's! I hope you enjoy and come back often!


Kits no longer available
(but thought you'd still be interested)
Life is Short
Strokin'
Janesko's Merry Christmas
I Believe in Faries
Friends Make the world
Mystic
Sexy
Let's Get Rocked!
Under the Mistletoe
Coffee Time with Friends
Blow Your Mind
Addicted to Love
Sending My Love
Never Weary of Life
Candy Girl
Sweet as Candy
Sexifullicious
Respect the Sisterhood
Newsflash Sweetie
Girlfriends
Believe In Faries





0 comments:
Post a Comment