


Wednesday, April 4, 2012
Spring is here!
This tutorial was written by me, Lori, on March 24, 2012. And it was written for those who should already have a basic knowledge of working with PSP. I used Paint Shop Pro X3 Do not copy this tutorial and post it through any group or claim it as your own. Please share a text link only.
Any resemblance to any other tutorial is strictly coincidental.
Supplies needed
Tube(s) of choice, I used the Artwork by ©Pinup Toons you must purchase a license found here.
PTU Scrapkit by Shani of Wicked Princess Scraps called Fairy Whispers and can be found here.
Tag template by Kaci made exclusively for Creative Misfits and can be found here.
For animation,
Butterflies of choice or you can use the ones I used,
here.
here.
Bubbles animation from Chaos, (at the moment they are down, hoping she gets them back up soon!)
you can get them at her blog, when up again, here.
you can get them at her blog, when up again, here.
Animation Shop if you choose to animate.
(instructions will be below the tutorial.)
Please remember to stop and save often.
Add drop shadow of choice as you go.
Refer to my example as needed, merge layers down as needed to make things a little easier.
Let's Rock this Tutorial!!
Open up the template.
Shift + D.
Close out the original.
Highlight Raster5 layer
Open the rainbow element, copy and paste as a new layer,
arrange up and slightly to the left, so it's over the white oval.
Delete Raster5 layer.
Go to Raster6 layer,
select-all-float-defloat
Go to Raster3 layer and hit the delete button on your keyboard.
Arrange Raster3 layer above Raster6 layer.
Go to Raster6 layer,
open paper of choice, I used paper1, Resize 75%.
Copy and paste as a new layer rearrange to fit over the rectangle.
Go back to Raster 6 layer, select-all-float-defloat-invert
Go to the paper layer and hit the delete button on your keyboard.
Delete Raster6 layer.
Go to Raster3 layer
With your Change target tool change the color to #b17e2a
Go to Raster4 layer,
open paper of choice, I used paper6. Resize 75%.
Copy and paste as a new layer rearrange to fit over the tall rectangle.
Go back to Raster4 layer, select-all-float-defloat-invert
Go to the paper layer and hit the delete button on your keyboard.
Paste paper1 as a new layer arrange above paper6 layer.
Go back to Raster4 layer, select-all-float-defloat-modify
expand by 2-invert, go to paper1 layer that you just added
and hit the delete button on your keyboard.
Go back to Raster4 layer, select-all-float-defloat-modify
contract by 5, go back to paper1 layer and hit the delete button on your keyboard.
You should now have a frame.
Delete Raster4 layer.
Open element Vine, rotate left and resize 50%
Copy and paste as a new layer and arrange to the right
of the tall rectangle.
Open element Rosedangles, resize 50%
Copy and paste as a new layer and arrange to the left
of the tall rectangle.
Open element VineLanteren, resize 50%
Copy and paste as a new layer and arrange to the left
of the long rectangle. (if adding a drop shadow,
I added the shadow on a new layer
and erased the part of the shadow for the 'light'.
Open element Grass.
Copy and paste as a new layer and arrange
to your liking in the middle of the tag.
Open flower elements of choice and resize,
I used Doodle Flowers resized at 40% and
Flowerbranch resized at 30%.
Paste as new layers, behind the grass and arrange to liking.
Go to Raster2 layer, (the butterfly)
Open the butterfly element, mirror and resize 40%
copy and paste as a new layer and arrange over the butterfly in the template.
Delete Raster2 layer.
Open paper5, resize 75%, copy and paste as new layer
above Raster7. Go to Raster7-select-all-float-defloat-invert
Go to the paper layer and hit the delete button on your keyboard.
Delete Raster7.
Add tube of choice above the grass layer and
arrange to your liking.
Open swing element, resize 50%
arrange to fit inside of frame.
Open tube of choice, same artist as the one above,
resize to fit on the swing.
Copy and paste as new layer and arrange on the swing.
Merge the swing and tube on one layer.
Go to Raster1 layer, and flood fill to desired color.
Add license, copyright info, name and save if you are stopping now.
Thanks for Rocking Out my tutorial, I hope you enjoyed! ~Lori
For animation:
Bubbles:
Make all layers of the tag visiable except for the swing and tube sitting on the swing.
Copy merged layers and paste as new animation in animation shop. Hold Ctrl + shift+ l
buttons and continue pasting until you have 60 frames.
Open the bubbles in animation shop. Delete frame 2, the credit frame.
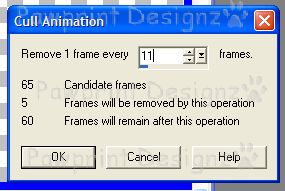
Edit-select all-animation-cull animation with the following settings.
Select-all-copy. Go to the tag in animation, hit ctrl+a, then ctrl+e to paste into selected
frame. When it comes up, arrange it so the little blue dot in the first frame is in the middle
of the bubble wand, then right click.
Butterflies:
Open butterflies hit ctrl+a, ctrl+x, go to the tag, ctrl+a, ctrl+e, arrange butterflies to
liking, right click.
Swing:
go to paintshop pro, go to layers, view, invert.
So only the swing and tube sitting on it is visible, copy.
Go to animation shop, and paste as a new animation.
Go to
Insert Image Effect using the following settings:
Go to frame 4, select it, holding down the ctrl button, select every frame after frame 4,
hit the delete button on your keyboard, you should only have 3 frames left.
(you don't want the last frame being so small, that is why we made it with
10 and then deleted, if you make it with 3 frames, the last one would be to small.)
Go to the 1st frame, with your move tool, very CAREFULLY,
slide the swing to the top, do this for the 2nd and 3rd frames also.
This will be your '1st set of swing animation' for later use.

Ctrl+a, Ctrl+c, ctrl+v, (select-all-copy-paste as new animation)
Go to animation on your tool bar, reverse frames.
Ctrl+a, Ctrl+c, go to the 1st set of swing animation,
and paste after last frame.
Ctrl+a, Ctrl+c, go to last frame,
Ctrl+Shift+l, which will copy all 6 frames and paste them after the last frame.
Keep hitting Ctrl+Shift+l until you have 30 frames,
then hit Ctrl+a,Ctrl+c,
go to last frame,Ctrl+Shift+l, which will give you 60 frames total!
Hit Ctrl+a, Ctrl+c one more time!
Go to the tag, Ctrl+a, Ctrl+e to paste into selected frame,
once it shows up, arrange to fit just under the frame of the long rectangle.
Go to animation, with all frames still selected, frame properties, and set to 25.
View and Save animation!
(If you need help in saving an animation, click here.)
P.S. if there is any problem with this tutorial...please feel free to email me at pawprintdesignz@aol.com :)

Optimazation Tut for Animation Shop
Open Animation Shop
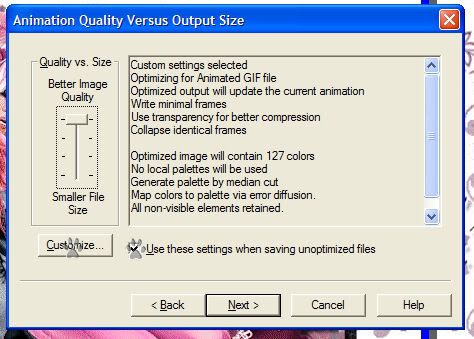
Go to Optimization Wizard, follow through each step below.

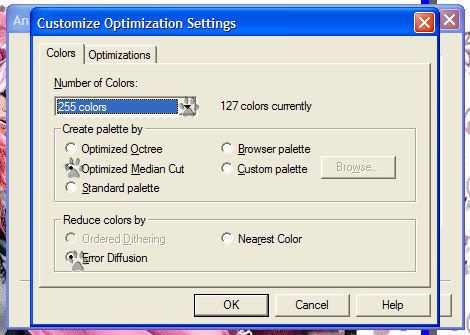
click on Customize in this window:
with these settings hit ok
then hit next
hit 'next', 'next', 'finish'
Save as and you're done! :)
Subscribe to:
Posts (Atom)
 Thanks to Shani of Wicked Princess Scraps for the use of her kit, Strength In Me, a FTU kit to help raise awareness in testicular cancer. No matter what kind of cancer it is, if you love someone with cancer, be by their side and 'Love them through it'.


- Lori
- Hello, my name is Lori. I work full time as a Grooming Salon Manager, I LOVE my 4 legged 'Babies'! (Hence the name of my blog) I'm soon to be married to a Great man, Put (actually it's his nickname). I have 2 Beautiful Daughters and 1 Handsome Son. I also have 2 Grandsons, Hunter and Trey, and a Step-Grandson, Logan! In my spare time I love to make tags and scrap page Lo's! I hope you enjoy and come back often!